Friday 26 April 2013

How to get infinity focus using kit lens (or lens without focusing meter)

A quick tip for night scape hunters out there who are using the original kit lens that came with the body. Since the lens does not have a distance focusing marker on it, it is a bit of hit and run trying to set the lens to infinity focus. The trick is to use your camera's auto focus on something really far away then switch it to manual focus without moving the focusing ring after that.

The best way is to do it way before you go on site and make a mark across the ring and the body so that the next time you are on site, all you have to do is to align the marks and you are done. Happy hunting.

Make a mark after focusing on distant objects

Thursday 18 April 2013

How to locate the Milky Way on site

Just like to share the 2 favourite Android applications that I use when I'm on-site shooting the Milky Way. Couple these applications with Stellarium on your PC desktop, now you will practically be able to plan ahead where you intend to shoot and what is the best time to shoot as described in my previous article.

1. Google Sky Map
With a simple interface this application is easy to use. I particularly like the feature where I can search for the constellation Scorpius and the time travel feature to allows me to plan ahead of time where the Milky will appear a few hours later.

2. Planets
A visually pleasing application that shows more than just the Milky Way on the screen. Does not have a search feature. Supports time travel too like Google Sky Map. Available for both the Android and iOS devices.


Sunday 14 April 2013

Sometimes Mother Nature will make a statement too

Just came back from a Milky hunt over the weekend with 29 (yes, that's correct, 29) of my friends and this time Mother Nature decided that she has had enough of us hunting down the Milky Way and decided to make the day cloudy and dull for us.

However, we were determined to try to at least get 1 shot so we stayed almost for 4 hours at the location until it started raining. Well, sometimes you win and sometimes you lose. There's always a next time.

At 2:15am

At 3:35 am
At 3:54 am

Friday 12 April 2013

How to use Spot Metering for better results

Sorry all but I've been rather busy during the whole of this week. In the meantime, why not have a look at the following article? Metering has always been the bane of many beginners and not so beginners so when I chanced upon this, I just could not resist sharing it out here. Enjoy!!

http://digital-photography-school.com/fine-tune-your-exposures-with-spot-metering

Sunday 7 April 2013

Do I need expensive gears for good landscape shots?

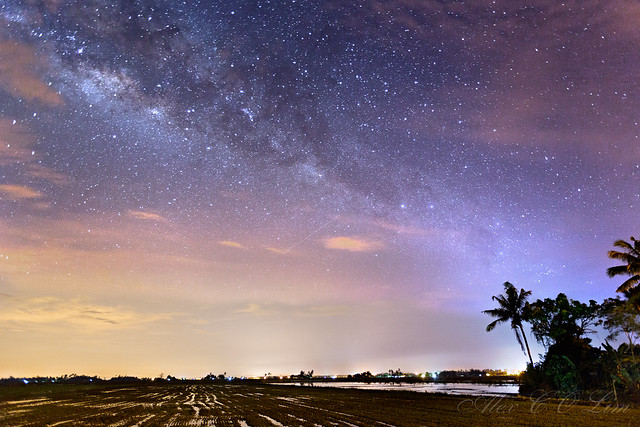
HDR shot processed from 3 bracketed shots
For my first weekend on Blogspot, I will try to answer one of the most frequently asked questions to me since my landscape shots were first posted - "Do I need EXPENSIVE gears for good landscape shots?"

First and foremost, my answer is an outright NO!!! Now, I know that many out there will want to debate this with each other and both camps will obviously have their reasoning to argue till the cows comes home (errr.. no disrespect meant to the cows living comfortably in their condos, but that's another story)

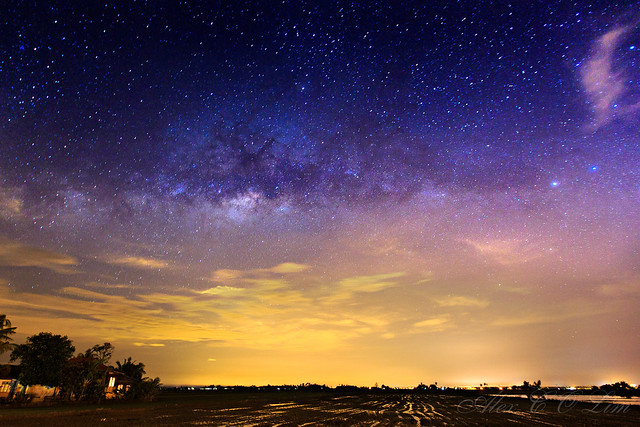
Guess which camera took this shot?
To me, the most important thing in a GOOD shot is always about framing, composition and exposure. Sure, having expensive professional gears might make your life easier in terms of having better contrast and color saturation that might save you some time in post processing, but it definitely does not replace having a good understanding of the basics. I'm not saying that having good complements like the LEE or Singh Ray filters does not help but you can overcome it with exposure bracketing and a little bit of work in Photoshop or Photomatix for HDR post processing.

In a nutshell, you can have the most expensive gear in the world and you will still take crap shots if you do not bother to shoot correctly while someone with patience to frame and compose correctly will beat you even with their hand phone camera.

Okay, so much for my rant and raves. Appreciate your comments if any. Happy Sunday everybody. :)


Friday 5 April 2013

How to find and shoot the Milky Way in Malaysia

I have always been asked this question a lot from time to time. Seriously, it took me quite a while to research and learn from the masters (sometimes paying a small fee) on how to snap the mysterious Milky Way from where I stay (Malaysia) without having to travel to overseas destinations such as Bali, New Zealand or Australia.


Basically it boils down to a few things to ensure a successful shooting environment
  1. To find a date and time where the moon is not visible in the night sky.
    • You can easily find the date by searching for a moon rise and set time on the Internet. Locate a date where the moon has either set below the horizon before your time of shooting or is a new moon night where there is practically no moon at all.
    • I frequently use this website to check for dates of the new new moon day for each month.
    • Plus or minus 4 days from the date of a new moon date is the recommended dates to shoot.
  2. Weather conditions must be good.
    • Always check Accuweather to ensure good weather conditions when shooting but do not depend on it for the final decision.
    • For example, last 2 weeks, a group of us went to Cameron Highlands with Accuweather predicting heavy cloud covers and thunderstorms. Indeed when we reached there, there was a heavy cloud cover until 2:30am in the morning. But by 3am the cloud started to clear and we managed to snap quite a few beautiful shots that day all the way until 6am in the morning.
  3. The densest part of the Milky Way is above the horizon at the time of shooting.
    • Most of the photographers snaps Milky Way with the densest part of it with the constellations Scorpious and Sagittarius in the shot. The Milky Way is the brightest and dense at this portion. 
    • You can determine it's location in advance using a software called Stellarium which is freely downloaded from the Internet.
Half an hour before we shot this, the whole sky was covered with thick clouds with lightning all around us.
To keep a long story short, I've compiled a PDF document for your reading pleasure. How To Shoot The Milky Way

Should you have any questions just contact me directly via my email or drop a comment below. 

Thursday 4 April 2013

Some of my latest shots of the Milky Way

Many people have asked me or commented that it's not possible to shoot the Milky Way in Malaysia. Well, not true at all. These shots was taken recently at Parit 14, Sg Besar about 20 minutes drive from Sekinchan.

Important things to remember is to find a relatively dark place with less light pollution to shoot. It is recommended to use a wide angle len so that you can include some foreground elements in the shot and a tripod plus a remote shutter cable is required.

Want to know more? Wait for my next post.

_LX_0548-3

_LX_0547

_LX_0532

Wednesday 3 April 2013

I DID IT!

Been thinking of starting a personal blog for quite some time now but has been holding it off due to the lack of direction and pure laziness. Well, I've finally decided to start and what I will blog about is about my favourite past time (no, not sleeping) which happens to be what a few hundred thousands out there are interested in too, PHOTOGRAPHY!!!

I'm mainly interested in Portraits (Studio and outdoors) and Landscape photography with the penchant for chasing the Milky Way at places near where I stay. The chase has brought me to many dark creepy places over the past 2 months since I restarted the chase for 2013 and will continue right up to the end of October, after which the best part of the Milky Way will be below the horizon for a few months until 2014.

Keep peeled for further updates from me later this week and I promise to reveal how you too can easily find the best time and place to shoot the Milky Way if you are interested.

Ciao for now. :)